Sunday, December 13, 2015

The fail-over configuration requires two identical security appliances connected to each other through a dedicated fail-over link and, optionally, a state full fail-over link. The health of the active interfaces and units is monitored to determine if specific fail-over conditions are met. If those conditions are met, fail-over occurs.

Active/Standby Fail-over lets you use a standby security appliance to take over the functionality of a failed unit. When the active unit fails, it changes to the standby state while the standby unit changes to the active state. The unit that becomes active assumes the IP addresses, or, for a transparent firewall, the management IP address, and MAC addresses of the failed unit and begins to pass traffic. 


First you should have two identical ASAs with fail-over feature enabled. you can verify it by issuing following command. If not you have purchase a license.
#show version


Primary Firewall 


1. Enable fail-over feature
FW01(config)#failover

2. Set FW as primary or secondary. FW01 configured as primary in given example.
FW01(config)#failover lan unit primary

3. Set the failover link which use to synchronize each other. Ge3 is configured as failover link and "failover-interface" is set as name of the interfaces in both FWs in given example.
FW01(config)#failover lan interface failover-interface GigabitEthernet3

4.Set failover interface primary and secondary ip addresses. 
FW01(config)#failover interface ip failover-interface 10.200.190.17 255.255.255.252 standby 10.200.190.18

Secondary Firewall 


1. Enable fail-over feature
FW02(config)#failover

2. Set FW as primary or secondary. FW02 configured as primary in given example.
FW02(config)#failover lan unit secondary

3. Set the failover link which use to synchronize each other. Ge3 is configured as failover link and "failover-interface" is set as name of the interfaces in both FWs in given example.
FW02(config)#failover lan interface failover-interface GigabitEthernet3

4.Set failover interface primary and secondary ip addresses. 
FW02(config)#failover interface ip failover-interface 10.200.190.17 255.255.255.252 standby 10.200.190.18

Done!!! :)

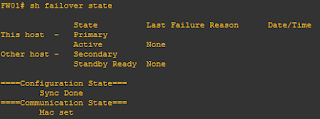
You can verify the whether it is working properly or not by issuing following command.

FW01# show failover state


FW02# show failover state


Continue reading

Sunday, October 25, 2015


 Network objects or object groups and service object or object groups are used for maintain and manage IPs and services more meaningful and easy way. Object can hold only one information related to ip or service and object group can hold many.

Network Objects


1. Create object with a meaningful object name using “object network” command. OBJ1 is given as       object name in given examples.
    hostname(config)# object network OBJ1

2. Give a meaningful description about the object. (optional)
    hostname (config-network-object)# description Engineering Network

3. Set ip details as required. Ip details can configure in four ways
    Note- you can only configure one line here
  •  as a single ip – use host command with a ip address                                                         
           hostname (config-network-object)# host 10.2.2.2
 or
  • as a network – use subnet command with network address and subnetmask                   
          hostname (config-network-object)# subnet  10.0.0.0 255.0.0.0
or
  • as a range of ip – use range command with first ip and last ip                                     
          hostname(config-network-object)# range 10.0.0.1 10.0.0.255 
or
  • as a FQDN – use fqdn command with full qualified domain name                                 
          hostname(config-network-object)# fqdn  ittipslk.blogspot.com


Network Object Groups


1. Use object-group network command with meaningful name. GRP1 is given as name in given               example.
    hostname (config)# object-group network GRP1

2. Give a meaningful description about the object. (optional)
    hostname (config-network)# description Administrator Addresses

3. Set ip details as required
Note- you can configure one or many lines here 
  • Set ip single ip detail using network-object host commad with the ip address    
          hostname(config-network)#network-object host 10.2.2.4     
          hostname(config-network)#network-object host 10.2.2.5
  • Set a previously created object inside object group using group-object command with object name 
          hostname(config-network)# group-object OBJ1

Service Objects


1. Create object with a meaningful object name using “object service” command. SER1 is given as         object name in given examples.
    hostname(config)# object service SER1

2. Set the service as required. You can use tcp/udp/icmp/icmp6 as protocols and eq/neq/lt/gt/range to     set port ranges
    Note- you can only configure one line here.

    examples...
  • Set source port greater than or equal tcp/6785 and destination tcp/ssh   
          hostname(config-service-object)# service tcp source gt 6785 destination eq ssh 
or
  • set destination ports from udp/53 to udp/63           
          hostname(config-service-object)# service udp destination range 53 63
or
  • set icmp packet type 3 and code 1
          hostname(config-service-object)# service icmp 3 1


Service Object Group


1. Use object-group service command with meaningful name. GRP2 is given as name in given                 example.
    hostname(config)# object-group service GRP2

2. Give a meaningful description about the object. (optional)
    hostname(config-service-object-group)# description  Test ports

3. Set port details as required. You can use tcp/udp/tcp-udp as protocols and eq/neq/lt/gt/range to             set port ranges
    Note- you can configure one or many lines here
  • Set source port greater than or equal tcp/1000 and destination tcp/ftp 
          hostname(config-service-object-group)# service-object source tcp gt 1000 destination tcp eq ftp
  • Set destination ports  tcp/53 and udp/53        
          hostname(config-service-object-group)# service-object destination tcp-udp eq 53
  • set source ports from tcp/50 to tcp/100     
          hostname(config-service-object-group)# service-object source tcp range 50 100
  • The following example shows how to add an object to a service object group     
          hostname(config-service-object-group)# service-object object WEB


Continue reading

Thursday, July 23, 2015

How to create a group policy?

1. Go to "Server Manager" --> "Tools" --> "Group Policy Management"


2. Right click on Group Policy Object (GPO) and create a new GPO. 


3. Right click on your newly created GPO and select edit to set a group policy


How to apply a group policy?


1.Right click where you need to apply policy on domain tree and select "Link existing GPO" to select the GPO


01. Password Policy

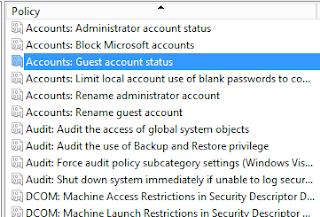
Password Policy is for change some attributes of domain users passwords to force users to apply good secure password to gain high security. Refer the following image to find the policy location.


There are 5 attributes under password policy.
Enforce password history – Determine the no of passwords, user account can use before it reuse its old password.
Maximum Password age – Valid period for users’ current password. User need to renew the password after exceeding this value.
Minimum Password age – Minimum days need to use password after changing it before change it again.
Password must meet complexity requirements – Password should met following requirements.
Not contain the user's account name or parts of the user's full name that exceed two consecutive characters.
Be at least six characters in length.
Contain characters from three of the following four categories:
English uppercase characters (A through Z)
English lowercase characters (a through z)
Base 10 digits (0 through 9)
Non-alphabetic characters (for example, !, $, #, %)
Store passwords using reversible encryption - This security setting determines whether the operating system stores passwords using reversible encryption. This policy provides support for applications that use protocols that require knowledge of the user's password for authentication purposes. This is same as keeping password in plain text


02. Account Lock Policy

This policy prevents malicious user access by locking the user account for period of time after particular no of attempts of unsuccessful passwords. This will prevent attempts of burst force attacks.

Account Lock Down Duration – Period of time account keep lock after unsuccessful attempts
Account lockout threshold – No times user can try password before account get lock
Reset account lockout counter after – Period of time need to reset, lock out counter to 0


03. Rename Administrator Account

This policy use to rename the local administrator accounts in domain computers. Keeping default local administrator account may vulnerable for attacks because everyone know the username.


04. Guest account statues

This policy is use to enable or disable local guest account. Accessing through a guest account will also reveal considerable amount of data about domain computer. So disabling it will increase the security level.


05. All Removable Storage classes: Deny all access

This policy will disable mounting all removable disks. This will prevent stealing sensitive data out from computer and virus attacks which come though removable disks.


Continue reading

Monday, June 29, 2015

Primary Partition


A primary partition is in which an Operating System can be installed. One MBR hard disk may contain a maximum of 4 primary partitions. An active partition is based on primary partition. Any one of the 4 primary partitions can be set as active partition. Since there can be 4 primary partitions with 4 different Operating Systems installed, one of the partition that is marked active is used for the initial booting.


Extended Partition


Because the primary only can be created four maximum, this need to use extended partition to break the limitation of 4 partitions. In an Extended Partition you can create unlimited logical drives. You can store data in the logical partitions similar with primary partition, but the extended partition is not used to store data, because the Extended Partition is used to hold logical partitions, at the same time, there is one extended partition on a disk.


Logical Partition

A logical partition is a a partition that has been created inside of an extended partition.


Primary Partion
Extended Partition
Logical  Partition
1
fdisk /dev/sdb
fdisk /dev/sdb
fdisk /dev/sdb
2
3
1
2
5
4
p   
e
l
5
press enter    
press enter    
press enter    
6
+200M         
+200M         
+150M         
7
t

t
8
83

8e     
9
p
p
p
10
w     
w     
w     
11


partprob /dev/sdb
12
mkfs.ext4 /dev/sdb1 

mkfs.ext4 /dev/sdb5 
13
mkdir /PARTITION1   

mkdir /PARTITION2 
14
vim /etc/fstab 
/dev/sdb1 /PARTITION1 ext4 defaults 0 0

vim /etc/fstab 
/dev/sdb5 /PARTITION2 ext4 defaults 0 0
15
mount -a   

mount -a   
16
df -h  

df -h  

Assume we have installed a new physical drive as "sdb" .The name can be vary on disk type and no of disks installed. 

sd - SCSI disks. and all removable data carriers.
eg - sda, sdb,sdc, ...

vd -Virtual disks on virtual server environment.
eg- vda, vdb, vdc, ...

1. Select the physical disk.

2. Press 'n' and Enter.

3. Set a unique no for disk partition. (note that server set next available unique no as disk partition no by default) 

4. Select the partition type( 'p' for primary, 'e' for extended and 'l' for logical) and press Enter. Note that when creating a logical partition, there should be a extended partition or else you have to configure it first.

5. Select the starting cylinder point. Set it with default value by pressing Enter.(Note that system set next free cylinder point by default)

6. Select the end cylinder point. It's difficult to figure out the end cylinder point no which need to create a required size of disk partition. So we set disk size instead of end cylinder point no and you can't go beyond the size of the physical disk. (I have set +200M to create 200MB partiton in given example)
eg :- +200     - 200Bytes 
        +200K   - 200KB
        +200M  - 200MB
        +200G  - 200GB

7. Type 't'. Then select the correct partition id and select the partition system type.

8. I have selected Linux for primary partition and Linux LVM for logical partition by typing "83" and "8e" id in given examples. you can list the ids by pressing 'l'

9 . List the created partitions on selected physical disk by pressing 'p' and Enter
You will see an output like follows...


Note that primary partition system is displays as "Linux" , Extended partition system is display as "Extended" and Logical partition system is display as "Linux LVM". (Note the device name of created partitions  )

10. Save the configuration by pressing 'w' and Enter.
End of creating extended partition. :) 

11. Enter given command to update the partition table specially when creating logical partitions.

12.Format the partition. Note that partitions has been formatted in ext4 format in given examples.

13. Create a mount point. This can be any location. I have created PARTITION1 for primary partition and PARTITION2 for logical partition inside '/'

14. Add given lines to fstab.


15. mount all partitions.

16. Verify by checking /PARTITION1 and /PARTITION2 is there in receiving output.


Continue reading